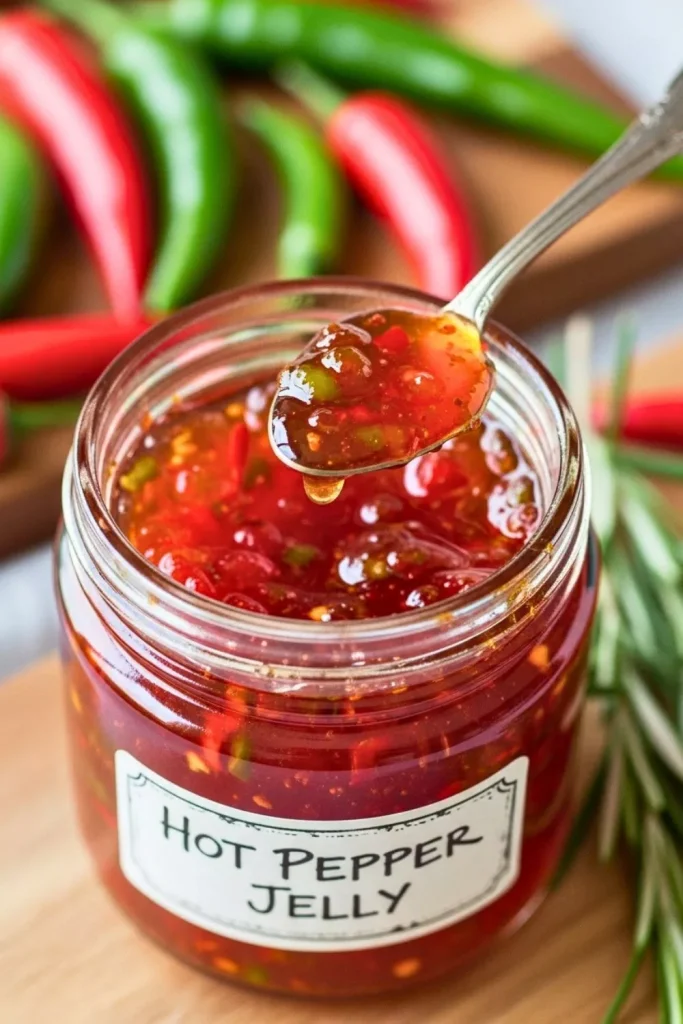
Hot pepper jelly hits that perfect sweet-heat balance people never forget.
One spoonful tastes bright, sticky, spicy, and just sharp enough to wake up everything from cream cheese and crackers to grilled chicken and burgers.
What makes it so good is the contrast.
Sugar softens the fire, vinegar keeps it lively, and pectin gives it that glossy jelly texture that feels right at home beside other jam recipes homemade and classic home canning recipes.
Hot Pepper Jelly Recipe
This is the kind of spicy pepper jelly recipe I come back to because it is bold, clear in flavor, and actually sets well.
It uses bell peppers for body and color, hot peppers for heat, vinegar for balance, and liquid pectin for that smooth, spoonable finish.
Tested pepper jelly formulas from trusted canning sources follow this same structure: peppers, vinegar, sugar, and pectin, with boiling-water processing for shelf-stable jars.
Ingredients
- 2 cups finely chopped red bell pepper
Adds sweetness, bright color, and bulk. - 1 cup finely chopped green bell pepper
Gives the jelly a deeper pepper flavor and that classic savory edge. - 1/2 cup finely chopped jalapeños
Brings clean, steady heat. - 1 to 2 finely chopped red Fresno peppers or serranos
Use one for medium heat, two for a hotter batch. - 1 1/2 cups white vinegar, 5% acidity
This matters in canning recipes because the acidity affects both flavor and safety. Trusted pepper jelly recipes use measured vinegar with standard 5% acidity. - 6 cups granulated sugar
Needed for the classic glossy texture and balanced sweet-hot taste. - 1 pouch liquid pectin, 3 ounces
Helps the jelly set reliably. - 1/2 teaspoon unsalted butter, optional
Helps reduce foam on top.
Step-by-step Instructions
1. Prep the jars and canner
Wash 5 half-pint jars, lids, and bands. Set the jars in hot water and keep them warm.
Prepare a boiling-water canner and have the water heating while you make the jelly.
Research-based home canning guidance recommends hot jars, clean lids, and water-bath processing for jellies like this.
2. Chop the peppers
Finely chop the bell peppers and hot peppers. Try to keep the pieces small and even so the jelly looks good and spreads nicely.
Wear gloves when handling the hot peppers.
If you want more heat, leave in a little of the membrane.
Home preservation guidance notes that much of the capsaicin heat stays in the membrane, not just the seeds.
3. Build the base
Add the chopped peppers and vinegar to a large, deep pot. Bring the mixture to a boil over medium-high heat.
Let it cook for about 5 to 10 minutes, stirring often, so the peppers soften slightly and the flavor starts moving into the liquid.
Some tested recipes puree the peppers with vinegar before boiling, while others keep them finely chopped.
Both approaches are used in reputable pepper jelly recipes, so this chopped version stays true to the same method while giving the jelly more texture.
4. Add the sugar
Pour in all the sugar and stir until it fully dissolves. Once the mixture reaches a full rolling boil that does not stop when stirred, keep it there for 1 minute.
This step is important. Jelly texture depends on the right balance of sugar, acid, and pectin.
Reliable canning references stress measured formulas for jams and jellies because changing those ratios too much affects the set.
5. Stir in the pectin
Add the liquid pectin and the optional butter. Stir constantly and return the mixture to a hard boil.
Boil for 1 full minute, then remove the pot from the heat.
Do not overcook it. Overheating pectin can weaken the gel, which is one reason soft or runny jelly happens.
6. Fill the jars
Ladle the hot jelly into the warm jars, leaving 1/4-inch headspace. Wipe the rims, apply the lids, and screw on the bands until fingertip tight.
A 1/4-inch headspace is standard for many jelly recipes and appears in trusted home canning guidance for pepper jelly.
7. Process the jars
Lower the jars into the boiling-water canner. Make sure the water covers the jars by at least 1 inch.
Process for 10 minutes, adjusting for altitude if needed, then remove the jars and let them cool undisturbed for 12 to 24 hours.
Boiling-water processing is the standard method for pepper jellies in established canning guidance.
8. Let it set
As the jars cool, the jelly thickens. After 24 hours, check the seals. Store sealed jars in a cool, dark place. Refrigerate any unsealed jar and use it first.
Nutrition (approx)
Per 1 tablespoon:
- Calories: 45
- Carbohydrates: 11 g
- Sugar: 10 g
- Sodium: 0 to 5 mg
- Fat: 0 g
This is a sweet jelly first, with peppers bringing flavor more than calories. Like most classic pepper jelly recipes, the sugar does the heavy lifting for taste and texture.
PinnedDrinks Secrets
- Use a mix of bell peppers and hot peppers. Bell peppers keep the flavor round, while the hot peppers bring the real kick that makes hot pepper jelly worth making.
- Chop everything finely. Big chunks make the jelly look rough and spread unevenly.
- Do not cut back the vinegar in a canned batch. In home canning recipes, that measured acidity is part of what keeps the formula dependable.
- Do not guess on the pectin. Follow the pouch amount exactly if you want a clean set.
- This jelly is incredible over cream cheese, brushed on grilled meat, tucked into sandwiches, or spooned beside roasted vegetables.
Final Thoughts
A good pepper jelly recipe should taste sharp, glossy, sweet, and properly hot.
This one does all of that without getting fussy. It is simple enough for a first batch, but good enough to earn a permanent spot in your jam recipes homemade list.
If you enjoy bold preserves, this recipe also opens the door to fun variations later, like a pineapple pepper jelly for a tropical twist or even savory-sweet ideas that sit closer to tomato jelly and other modern pantry spreads.
But this classic version is the one to master first.